PyQt 是一个强大的 Python 库,用于创建图形用户界面(GUI),可以用来代替 Python 内置的 Tkinter。
PyQt 是 Qt 框架的 Python 绑定,广泛应用于桌面应用程序开发。
Qt 是一个跨平台的 C++ 应用程序开发框架。
PyQt 允许 Python 开发者利用 Qt 库创建功能强大的 GUI 应用程序。
在 Windows 系统上安装PYQT6
PyQt6 对于 Windows 系统的安装方式与其他应用程序或库类似。自 Qt 5.6 起,可通过 Python 包存档(PyPi)安装 PyQt6。要从 Python 3 安装 PyQt6,只需运行以下命令:
pip3 install pyqt6
安装完成后,您应该能够运行 Python 并导入 PyQt6。
创建第一个PYQT6程序
from PyQt6.QtWidgets import QApplication,QWidget
import sys # 仅用于访问命令行参数
每个应用程序需要一个(且只有一个)QApplication 实例
输入 sys.argv,这可以允许应用程序使用命令行参数
如果知道不会使用命令行参数,也可以使用 QApplication([])
app = QApplication(sys.argv)
w = QWidget()   # 创建一个 Qt widget作为我们的窗口
w.show()    # 这很重要!!!!! 默认情况下,窗口是隐藏的
app.exec()  # 开始事件循环
(一) QMainWindow
QMainWindow 。 是一个预制的窗口部件,它提供了大量您可能会使用的标准窗口功能,包括工具栏、菜单、状态栏、可停靠控件等
在 Qt 中任何控件都可以是窗口。 例如,如果您使用 QPushButton代替 QtWidget 。 在下面的示例中,您将得到一个有一个可按下的按钮的窗口
    import sys

    from PyQt6.QtWidgets import (
    QApplication,
    QMainWindow,
    QPushButton,
    )

 #创建子类 QMainWindow 来自定义您的应用程序的主窗口

class MainWindow(QMainWindow):
    def __init__(self):
        super().__init__() #2
        self.setWindowTitle("My App")
        button = QPushButton("Press Me!")
        # 设置窗口的中心控件
        self.setCentralWidget(button)

app = QApplication(sys.argv)
window = MainWindow()
window.show()
app.exec()
(二) QSize 调整窗口和控件的大小
以下代码将创建一个固定尺寸的 400x300 像素窗口
import sys
from PyQt6.QtCore import QSize, Qt
from PyQt6.QtWidgets import QApplication, QMainWindow, QPushButton
 #创建子类 QMainWindow 来自定义您的应用程序的主窗口
class MainWindow(QMainWindow):
    def __init__(self):
        super().__init__()
        self.setWindowTitle("My App")
        button = QPushButton("Press Me!")
        self.setFixedSize(QSize(300, 300)) #1
        # 设置窗口的中心控件
        self.setCentralWidget(button)
app = QApplication(sys.argv)
window = MainWindow()
window.show()
app.exec()
信号和槽
槽是 Qt 用于接收信号的名称。在 Python 中,应用程序中的任何函数(或方法)都可以用作槽——只需将信号连接到它即可。如果信号发送数据,则接收函数也会接收到该数据。许多 Qt 控件也有自己的内置槽,这意味着您可以直接将 Qt 控件连接在一起
(一)QPushButton 的信号
我们简单的应用程序目前有一个 QMainWindow ,其中 QPushButton 被设置为中央控件。首先,我们这个按钮与一个自定义的 Python 方法连接起来。在这里,我们创建了一个名为the_button_was_clicked 的简单自定义槽,它接受来自 QPushButton 的点击信号
from PyQt6.QtWidgets import (
    QApplication,
    QMainWindow,
    QPushButton,
) #1
import sys
class MainWindow(QMainWindow):
    def __init__(self):
        super().__init__() #2
        self.setWindowTitle("My App")
        button = QPushButton("Press Me!")
        button.setCheckable(True)
        button.clicked.connect(self.the_button_was_clicked)
        # 设置窗口的中心控件
        self.setCentralWidget(button)

    def the_button_was_clicked(self):
        print("Clicked!")

app = QApplication(sys.argv)
window = MainWindow()
window.show()
app.exec()
(三) 接收数据
我们已经知道信号还可以发送数据,以提供更多关于刚刚发生的事件的信息。 .clicked 信号也不例外,它还提供了按钮的选中(或切换)状态。对于普通按钮,该状态始终为False ,因此我们的第一个槽忽略了这些数据。但是,我们可以让按钮可选中,然后看看效果。在下面的示例中,我们将添加第二个槽用于输出检查状态
import sys
from PyQt6.QtWidgets import (
    QApplication,
    QMainWindow,
    QPushButton,
) #1
class MainWindow(QMainWindow):
    def __init__(self):
        super().__init__() #2
        self.setWindowTitle("My App")
        button = QPushButton("Press Me!")
        button.setCheckable(True)
        button.clicked.connect(self.the_button_was_clicked)
        button.clicked.connect(self.the_button_was_toggled)
        # 设置窗口的中心控件
        self.setCentralWidget(button)
    def the_button_was_clicked(self):
        print("Clicked!")
    def the_button_was_toggled(self, checked):
        print("Checked?", checked)

app = QApplication(sys.argv)
window = MainWindow()
window.show()
app.exec()
(四) 存储数据
将按钮的选中值存储在名为 button_is_checked 的变量中
import sys
from PyQt6.QtWidgets import (
    QApplication,
    QMainWindow,
    QPushButton,
) #1
class MainWindow(QMainWindow):
    def __init__(self):
        super().__init__()
        self.button_is_checked = True
        self.setWindowTitle("My App")
        self.button = QPushButton("Press Me!")  # 1
        self.button.setCheckable(True)
        self.button.released.connect(self.the_button_was_released)  # 2
        self.button.setChecked(self.button_is_checked)

        # 设置窗口的中心控件
        self.setCentralWidget(self.button)

    def the_button_was_released(self):
        self.button_is_checked = self.button.isChecked()  # 3

        print(self.button_is_checked)

app = QApplication(sys.argv)
window = MainWindow()
window.show()
app.exec()
- 我们需要保留对按钮的引用,以便在我们的槽中访问它。
- 释放信号在按钮释放时触发,但不会发送检查状态。
- .isChecked() 返回按钮的检查状态。
(五) 更改界面标题
from PyQt6.QtWidgets import QApplication, QMainWindow, QPushButton
import sys

class MainWindow(QMainWindow):
    def __init__(self):
        super().__init__()

        self.setWindowTitle("My App")
        self.button = QPushButton("Press Me!")  # 1
        self.button.clicked.connect(self.the_button_was_clicked)

        # 设置窗口的中心控件
        self.setCentralWidget(self.button)

    def the_button_was_clicked(self):
        self.button.setText("You already clicked me.")  # 2
        self.button.setEnabled(False)  # 3

        # 我们也来更改窗口标题
        self.setWindowTitle("My Oneshot App")

    app = QApplication(sys.argv)
    window = MainWindow()
    window.show()
    app.exec()
- 我们需要在 the_button_was_clicked 方法中访问该按钮,因此我们将其引用保存在self中。
- 您可以通过向 .setText() 方法传递一个字符串来更改按钮的文本。
- 要禁用按钮,请调用 .setEnabled() 方法并传入 False。
大多数控件都有自己的信号,我们用于窗口的 QMainWindow 也不例外。 在下面的更复杂的示例中,我们将 QMainWindow 上的 .windowTitleChanged 信号连接到自定义槽方 法 the_window_title_changed 。该槽还会接收新窗口标题
from PyQt6.QtWidgets import QApplication, QMainWindow, QPushButton
import sys
from random import choice
window_titles = [
    "My App",
    "My App",
    "Still My App",
    "Still My App",
    "What on earth",
    "What on earth",
    "This is surprising",
    "This is surprising",
    "Something went wrong",
] #1
class MainWindow(QMainWindow):
    def __init__(self):
        super().__init__()
        self.n_times_clicked = 0
        self.button = QPushButton("Press Me!")
        self.button.clicked.connect(self.the_button_was_clicked)
        self.windowTitleChanged.connect(
        self.the_window_title_changed
        ) #2
    # 设置窗口的中心控件
        self.setCentralWidget(self.button)
    def the_button_was_clicked(self):
        print("Clicked.")
        new_window_title = choice(window_titles)
        print("Setting title: %s" % new_window_title)
        self.setWindowTitle(new_window_title) #3
    def the_window_title_changed(self, window_title):
        print("Window title changed: %s" % window_title) #4
        if window_title == "Something went wrong":
            self.button.setDisabled(True)

app = QApplication(sys.argv)
window = MainWindow()
window.show()
app.exec()
- 使用 random.choice() 从窗口标题列表中进行选择。
- 将我们的自定义槽方法 the_window_title_changed 连接到 windows 的.windowTitleChanged 信号。
- 将窗口标题设置为新标题。
- 如果新窗口标题为“Something went wrong”(出现错误),则禁用该按钮。
控件
本端前置代码,内容不包含,测试代码请自行添加
import sys
from PyQt6.QtCore import Qt
from PyQt6.QtWidgets import QApplication,  QMainWindow

app = QApplication(sys.argv)
window = MainWindow()
window.show()
app.exec()
(一)QLabel
from PyQt6.QtGui import QLabel

class MainWindow(QMainWindow):
    def __init__(self):
        super().__init__()
        self.setWindowTitle("my app")

        widget = QLabel("CIALLO")
        font = widget.font()
        font.setPointSize(30)
        widget.setFont(font)
        widget.setAlignment(
            Qt.AlignmentFlag.AlignHCenter| Qt.AlignmentFlag.AlignVCenter
        )
        self.setCentralWidget(widget)
- 我们使用
.font() 获取当前字体,对其进行修改,然后将其应用回去。这样可以
确保字体与系统字体样式保持一致。 对齐方式通过 Qt. 命名空间中的标志来指定。
photo 加载中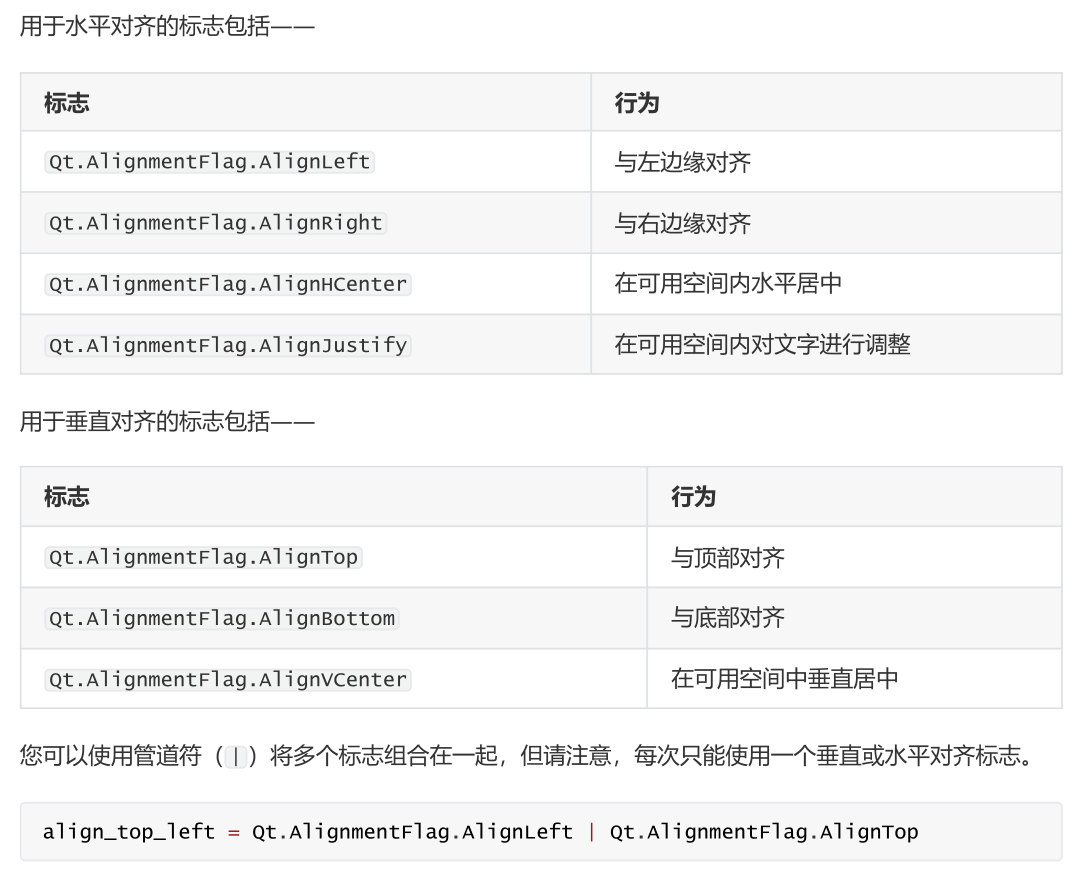 photo 加载中
有趣的是,您也可以使用 QLabel 通过 水平和垂直居中 .setPixmap() 方法显示一张图片。该方法接受一个像素图(像素数组),您可以通过将图片文件名传递给 QPixmap 来创建它。在随本书提供的示例文件中,您可以找 到一个名为 otje.jpg 的文件,您可以按照以下方式在窗口中显示它:import os
from PyQt6.QtGui import QPixmapbasedir = os.path.dirname(__file__)
print("Current working folder:", os.getcwd()) # 1
print("Paths are relative to:", basedir) # 2class MainWindow(QMainWindow):
 def __init__(self):
     super().__init__()
     self.setWindowTitle("My App")
     widget = QLabel("Hello")
     widget.setPixmap(QPixmap("1.jpg"))
     self.setCentralWidget(widget)
(二)QCheckBox 勾选框
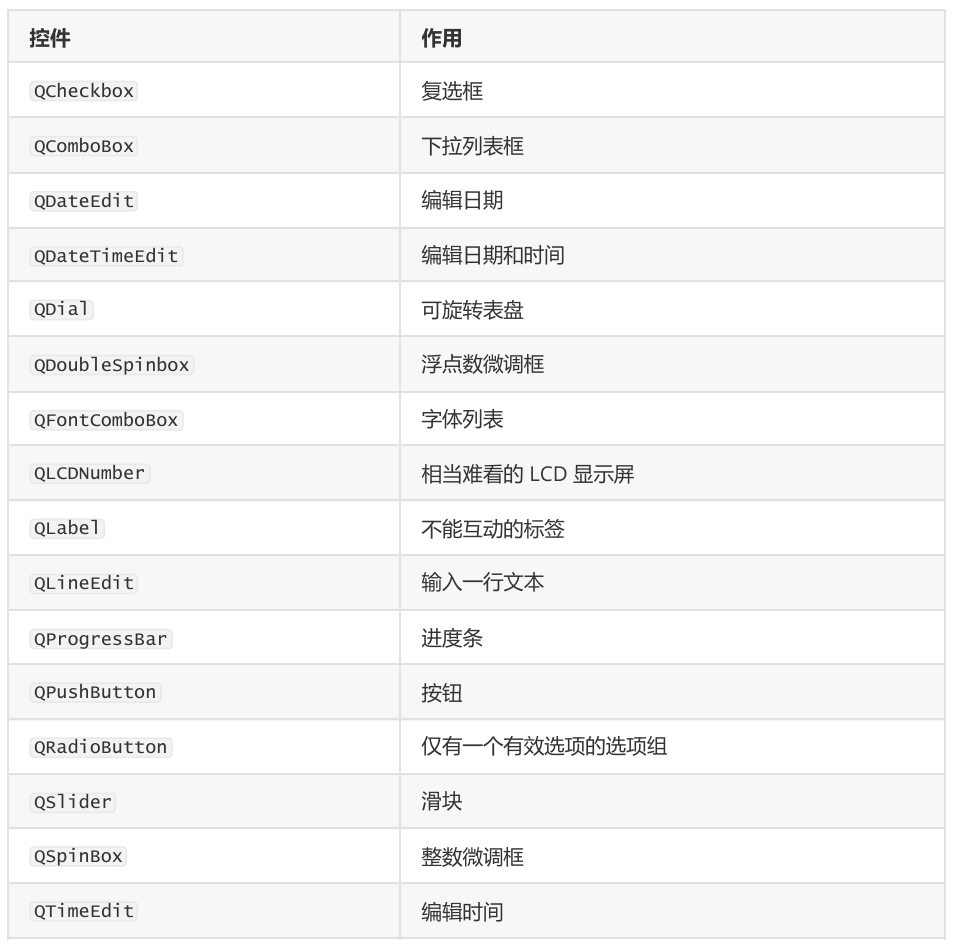
QCheckBox ,顾名思义,它为用户提供了一个可选框。然而,与所有 Qt 控件一
样,它也有许多可配置的选项来更改控件的行为。
from PyQt6.QtWidgets import QCheckBox
class MainWindow(QMainWindow):
    def __init__(self):
        super().__init__()

        self.setWindowTitle("My App")
        widget = QCheckBox("This is a checkbox")
        # widget.setCheckState(Qt.CheckState.Checked)
        # 对于三态:widget.setCheckState(Qt.PartiallyChecked)
        # 或:
        widget.setTristate(True)
        widget.stateChanged.connect(self.show_state)
        self.setCentralWidget(widget)


    def show_state(self, s):
        print(Qt.CheckState(s) == Qt.CheckState.Checked)

        print(s)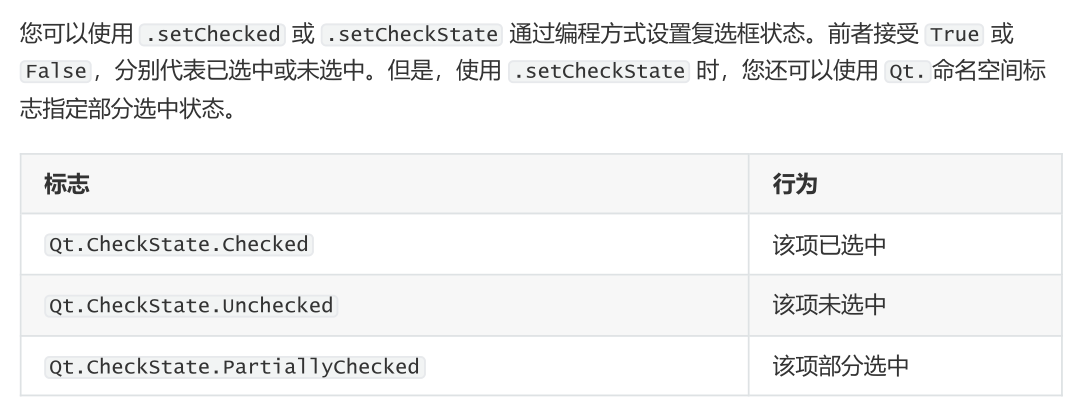
(三)QComboBox 下拉列表
QComboBox 是一个下拉列表,默认情况下处于关闭状态,需要点击箭头才能打开。您可以从列表中选择一个项目,当前选中的项目将作为标签显示在控件上。组合框适用于从长列表中选择一个选项。
您可能在文字处理应用程序中见过用于选择字体样式或字号的组合框。尽管 Qt实际上提供了一个专门用于字体选择的组合框,即 QFontComboBox 。
您可以通过向 .addItems() 方法传递一个字符串列表来向 QComboBox 添加项。项将按您提供的顺序依次添加。
from PyQt6.QtWidgets import QComboBox
class MainWindow(QMainWindow):
    def __init__(self):
        super().__init__()
        self.setWindowTitle("My App")

        widget = QComboBox()
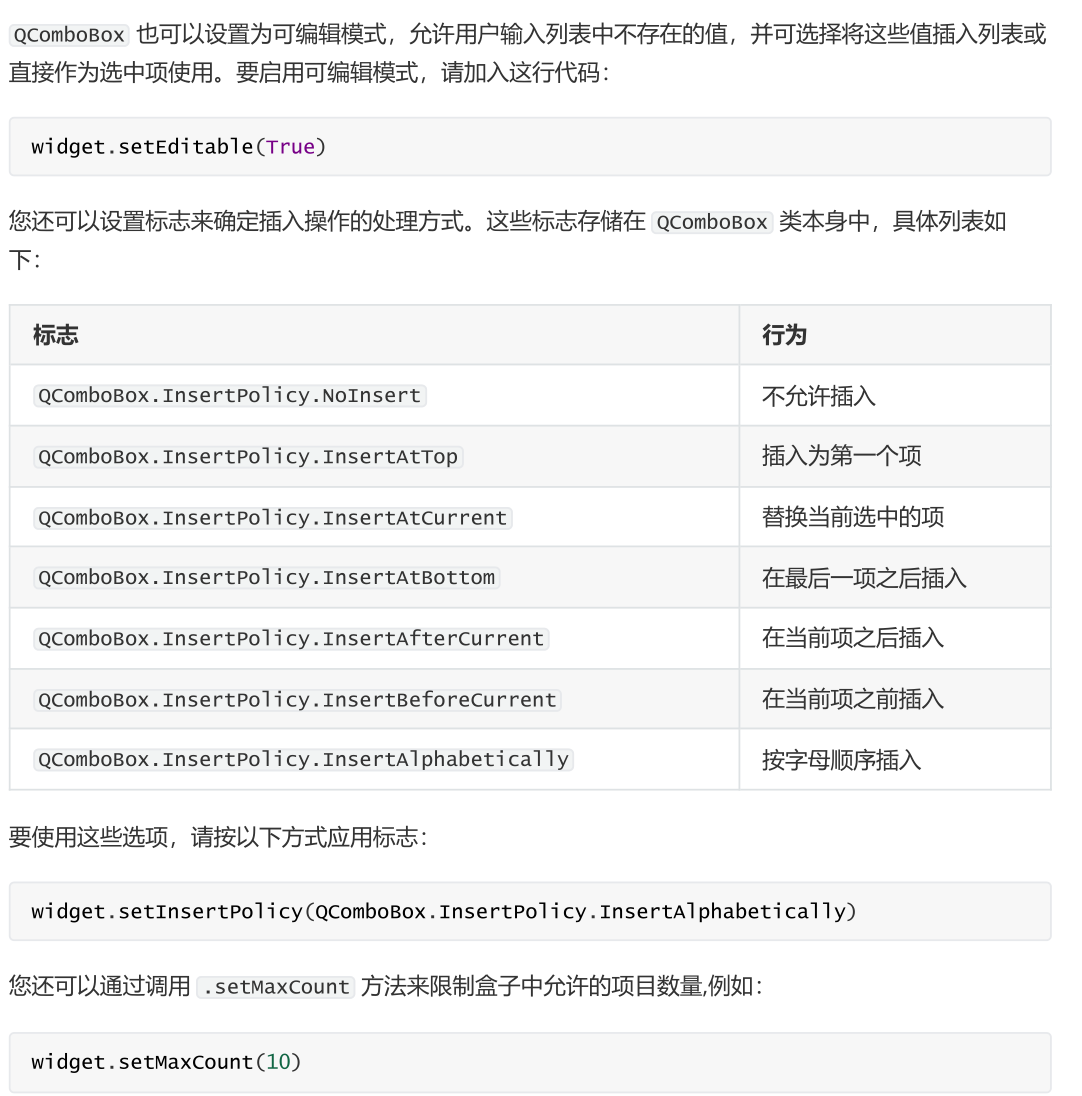
        widget.setEditable(True)
        widget.setInsertPolicy(QComboBox.InsertPolicy.InsertAlphabetically)
        widget.addItems(["One", "Two", "Three"])
        widget.currentIndexChanged.connect(self.index_changed)
        widget.currentTextChanged.connect(self.text_changed)
        self.setCentralWidget(widget)

    def index_changed(self, i): # i是一个int型整数
        print(i)
    def text_changed(self, s): # s是一个str型的字符串
        print(s)
(四)QListWidget选项列表
该控件与 QComboBox 类似,只是选项以可滚动列表的形式呈现。它还支持同时选择多个项目。 QListWidget 提供了一个 currentItemChanged 信号,该信号发送QListItem(列表控件的元素),以及一个 currentTextChanged 信号,该信号发送当前项目的文本。
from PyQt6.QtWidgets import QListWidget
class MainWindow(QMainWindow):
    def __init__(self):
        super().__init__()
        self.setWindowTitle("My App")
        widget = QListWidget()
        widget.addItems(["One", "Two", "Three"])
        widget.currentItemChanged.connect(self.index_changed)
        widget.currentTextChanged.connect(self.text_changed)
        self.setCentralWidget(widget)
    def index_changed(self, i): #不是索引,i 是 QListItem
        print(i.text())
    def text_changed(self, s): # s是一个str型的字符串
        print(s)
(六) QListWidget文本输入框
QLineEdit 控件是一个简单的单行文本编辑框,用户可以在其中输入内容。这些控件用于表单字段或没有限制有效输入列表的设置。例如,输入电子邮件地址或计算机名称时
from PyQt6.QtWidgets import QLineEdit
class MainWindow(QMainWindow):
    def __init__(self):
        super().__init__()
        self.setWindowTitle("My App")
        widget = QLineEdit()
        widget.setMaxLength(10)

        widget.setPlaceholderText("Enter your text")

        widget.setReadOnly(False) # TRUE以设置为只读模式

        widget.returnPressed.connect(self.return_pressed)
        # widget.selectionChanged.connect(self.selection_changed)
        widget.textChanged.connect(self.text_changed)
        widget.textEdited.connect(self.text_edited)

        self.setCentralWidget(widget)
    def return_pressed(self):
        print("Return pressed!")
        self.centralWidget().setText("BOOM!")
    # def selection_changed(self):
    #     print("Selection changed")
    #     print(self.centralWidget().selectedText())
    def text_changed(self, s):
        print("Text changed...")
        print(s)
    def text_edited(self, s):
        print("Text edited...")
        print(s)
(七) QSpinBox
QSpinBox 提供了一个带箭头的小数字输入框,用于增加和减少值。 QSpinBox 支持整数,而相关的控件 QDoubleSpinBox 支持浮点数
from PyQt6.QtWidgets import  QMainWindow, QSpinBox
class MainWindow(QMainWindow):
    def __init__(self):
        super().__init__()
        self.setWindowTitle("My App")

        widget = QSpinBox()
        # 或者: widget = QDoubleSpinBox()

        widget.setMinimum(-10)
        widget.setMaximum(3)
        # 或者: widget.setRange(-10,3)

        widget.setPrefix("$")
        widget.setSuffix("元")
        widget.setSingleStep(1)  # 或者,对于QDoubleSpinBox,使用0.5
        widget.valueChanged.connect(self.value_changed)
        widget.textChanged.connect(self.value_changed_str)

        self.setCentralWidget(widget)

    def value_changed(self, i):
        print(i)

    def value_changed_str(self, s):
        print(s)
(八) QSlider滑动条控件
QSlider 提供了一个滑动条控件,其内部功能与 QDoubleSpinBox 非常相似。它不会以数字形式显示当前值,而是通过滑块在控件长度上的位置来表示。当需要在两个极端值之间进行调整,但不需要绝对精确度时,此控件非常有用。此类控件最常见的用途是音量控制。还有一个额外的每当滑块移动位置时触发的 .sliderMoved 信号,以及一个每当滑块被点击时发出的.sliderPressed 信号
from PyQt6.QtWidgets import QSlider
class MainWindow(QMainWindow):
    def __init__(self):
        super().__init__()
        self.setWindowTitle("My App")
        widget = QSlider()

        widget.setMinimum(-3)
        widget.setMaximum(3)
        # 或者: widget.setRange(-10,3)

        widget.setSingleStep(3)
        widget.valueChanged.connect(self.value_changed)
        widget.sliderMoved.connect(self.slider_position)
        widget.sliderPressed.connect(self.slider_pressed)
        widget.sliderReleased.connect(self.slider_released)

        self.setCentralWidget(widget)
    def value_changed(self, i):
        print(i)
    def slider_position(self, p):
        print("position", p)
    def slider_pressed(self):
        print("Pressed!")
    def slider_released(self):
        print("Released")
(九) QDial模拟拨盘
QDial 是一个可旋转的控件,功能与滑块相同,但外观为模拟拨盘。它看起来很不错,但从 UI角度来看并不特别用户友好。然而,它们通常在音频应用程序中用作现实世界中的模拟拨盘的表示
from PyQt6.QtWidgets import QDial
class MainWindow(QMainWindow):
    def __init__(self):
        super().__init__()

        self.setWindowTitle("My App")

        widget = QDial()
        widget.setRange(0, 100)
        widget.setSingleStep(1)

        widget.valueChanged.connect(self.value_changed)
        widget.sliderMoved.connect(self.slider_position)
        widget.sliderPressed.connect(self.slider_pressed)
        widget.sliderReleased.connect(self.slider_released)

        self.setCentralWidget(widget)

    def value_changed(self, i):
        print(i)
    def slider_position(self, p):
        print("position", p)
    def slider_pressed(self):
        print("Pressed!")
    def slider_released(self):
        print("Released")
布局
photo 加载中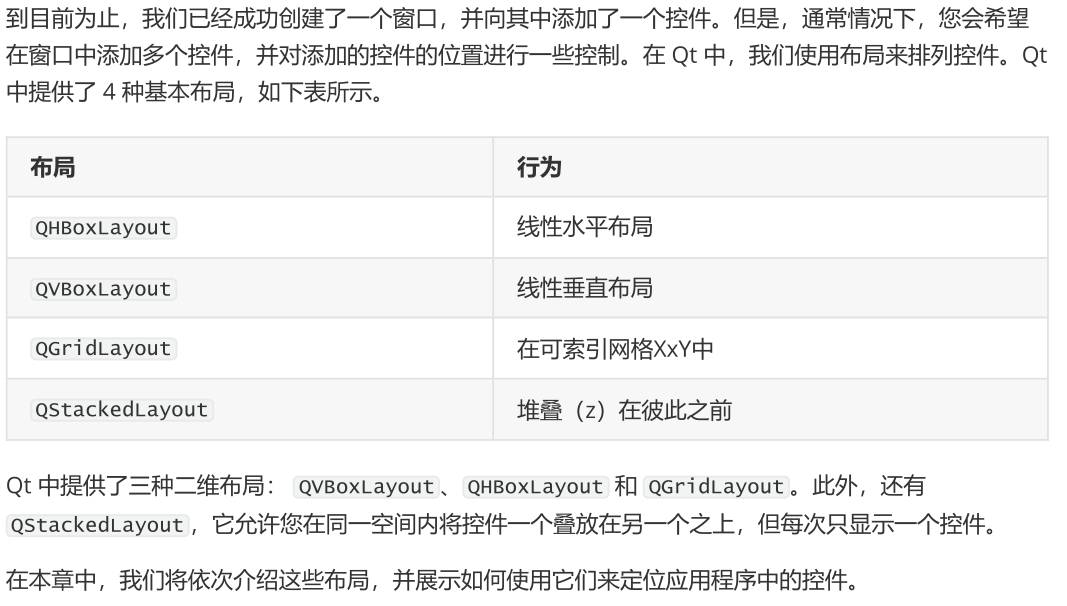
(一)占位符控件
为了更方便地可视化布局,我们将首先创建一个简单的自定义控件来显示我们选择的纯色。这有助于区分我们添加到布局中的控件。请您在与脚本相同的文件夹中创建一个新文件,并将其命名为layout_colorwidget.py ,并添加以下代码
from PyQt6.QtGui import QColor, QPalette
from PyQt6.QtWidgets import QWidget
class Color(QWidget):
    def __init__(self, color):
        super().__init__()
        self.setAutoFillBackground(True)
        palette = self.palette()
        palette.setColor(QPalette.ColorRole.Window, QColor(color))
        self.setPalette(palette)
首先,让我们使用新创建的“颜色”控件将整个窗口填充为单一颜色来测试这个控件。完成之后,我们可以使用 .setCentralWidget 将它添加到主窗口,这样就得到了一个纯红色的窗口。
import sys
from PyQt6.QtCore import Qt
from PyQt6.QtWidgets import QApplication, QMainWindow
from layout_colorwidget import Color
class MainWindow(QMainWindow):
    def __init__(self):
        super().__init__()
        self.setWindowTitle("My App")
        widget = Color("red")
        self.setCentralWidget(widget)

app = QApplication(sys.argv)
window = MainWindow()
window.show()
app.exec()
(二)QVBoxLayout垂直排列控件
使用 QVBoxLayout ,您可以将控件线性地排列在彼此之上。添加一个控件会将其添加到列的底部
import sys
from PyQt6.QtCore import Qt
from PyQt6.QtWidgets import (
   QApplication,
   QMainWindow,
   QVBoxLayout,
   QWidget,
)
from layout_colorwidget import Color

class MainWindow(QMainWindow):
    def __init__(self):
        super().__init__()
        self.setWindowTitle("My App")
        layout = QVBoxLayout()
        layout.addWidget(Color("red"))
        layout.addWidget(Color("green"))
        layout.addWidget(Color("blue"))
        widget = QWidget()
        widget.setLayout(layout)
        self.setCentralWidget(widget)

app = QApplication(sys.argv)
window = MainWindow()
window.show()
app.exec()
(三) QHBoxLayout水平排列控件
QHBoxLayout 与之相同,只是水平移动。添加控件会将其添加到右侧
import sys
from PyQt6.QtCore import Qt
from PyQt6.QtWidgets import (
   QApplication,
   QHBoxLayout,
   QLabel,
   QMainWindow,
   QWidget,
)
from layout_colorwidget import Color

class MainWindow(QMainWindow):
    def __init__(self):
        super().__init__()

        self.setWindowTitle("My App")
        layout = QHBoxLayout()
        layout.addWidget(Color("red"))
        layout.addWidget(Color("green"))
        layout.addWidget(Color("blue"))
        widget = QWidget()
        widget.setLayout(layout)
        self.setCentralWidget(widget)

app = QApplication(sys.argv)
window = MainWindow()
window.show()
app.exec()
(四)嵌套布局
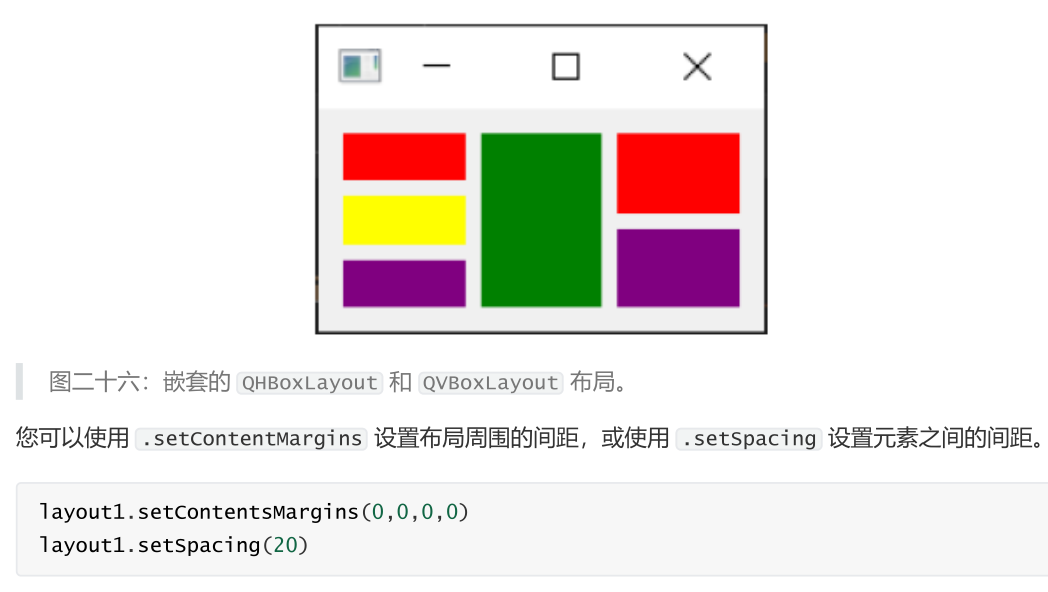
对于更复杂的布局,您可以使用 .addLayout 在布局中嵌套布局。下面,我们将 QVBoxLayout 添加到主 QHBoxLayout 中。如果我们将一些控件添加到 QVBoxLayout ,它们将垂直排列在父布局的第一个槽中。
class MainWindow(QMainWindow):
    def __init__(self):
        super().__init__()

        self.setWindowTitle("My App")

        layout1 = QHBoxLayout()
        layout2 = QVBoxLayout()
        layout3 = QVBoxLayout()

        #使用 .setContentMargins 设置布局周围的间距,或使用 .setSpacing 设置元素之间的间距。
        layout1.setContentsMargins(5, 0, 5, 0)
        layout1.setSpacing(10)

        layout2.addWidget(Color("red"))
        layout2.addWidget(Color("yellow"))
        layout2.addWidget(Color("purple"))

        layout1.addLayout(layout2)
        layout1.addWidget(Color("green"))

        layout3.addWidget(Color("red"))
        layout3.addWidget(Color("purple"))

        layout1.addLayout(layout3)

        widget = QWidget()
        widget.setLayout(layout1)
        self.setCentralWidget(widget)
(五)QGridLayout控件以网格形式排列
尽管它们非常有用,但如果您尝试使用 QVBoxLayout 和 QHBoxLayout 来布局多个元素(例如表单),您会发现很难确保不同大小的控件对齐。解决此问题的办法是使用 QGridLayout 。
class MainWindow(QMainWindow):
    def __init__(self):

        super().__init__()


        self.setWindowTitle("My App")
        layout = QGridLayout()
        layout.addWidget(Color("red"), 0, 0)
        layout.addWidget(Color("green"), 1, 0)
        layout.addWidget(Color("blue"), 1, 1)
        layout.addWidget(Color("purple"), 3, 3)
        widget = QWidget()
        widget.setLayout(layout)
        self.setCentralWidget(widget)
操作、工具栏与菜单
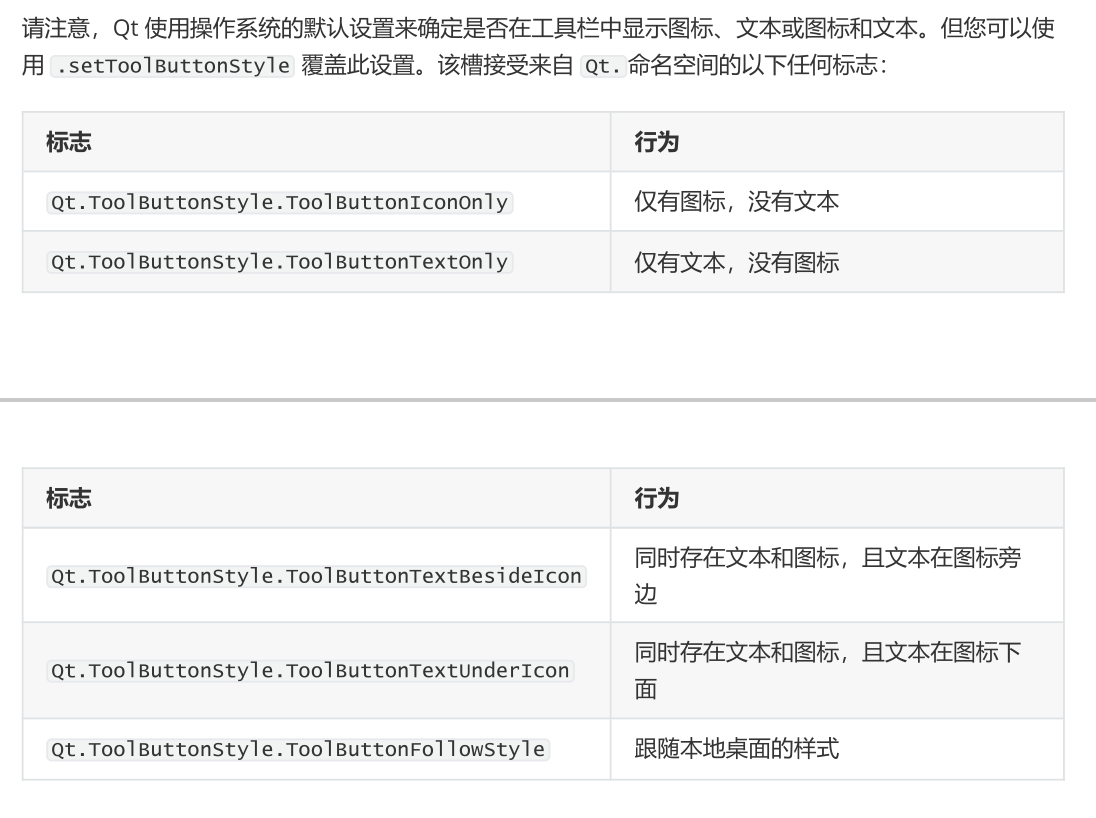
在 Qt 中,工具栏是通过 QToolBar 类创建的。首先,您需要创建该类的一个实例,然后调用QMainWindow 的 .addToolbar 方法。将一个字符串作为第一个参数传递给 QToolBar 类,即可设置工具栏的名称,该名称将用于在用户界面中识别该工具栏。
import sys

from PyQt6.QtCore import Qt
from PyQt6.QtGui import QAction
from PyQt6.QtWidgets import QLabel, QToolBar, QMainWindow, QApplication, QStatusBar


class MainWindow(QMainWindow):
    def __init__(self):
        super().__init__()
        self.setWindowTitle("My App")
        label = QLabel("Hello!")
        label.setAlignment(Qt.AlignmentFlag.AlignCenter)
        self.setCentralWidget(label)
        toolbar = QToolBar("My main toolbar")
        self.addToolBar(toolbar)
        button_action = QAction("Your button", self)
        button_action.setStatusTip("This is your button")
        button_action.triggered.connect(self.onMyToolBarButtonClick)
        button_action.setCheckable(True)
        toolbar.addAction(button_action)
        self.setStatusBar(QStatusBar(self))

    def onMyToolBarButtonClick(self, s):
        print("click", s)

app = QApplication(sys.argv)
window = MainWindow()
window.show()
app.exec()
import os
import sys
from PyQt6.QtCore import QSize, Qt
from PyQt6.QtGui import QAction, QIcon, QKeySequence
from PyQt6.QtWidgets import (
    QApplication,
    QLabel,
    QMainWindow,
    QStatusBar,
    QToolBar, QCheckBox,
)
basedir = os.path.dirname(__file__)
class MainWindow(QMainWindow):
    def __init__(self):
        super().__init__()
        self.setWindowTitle("My App")
        label = QLabel("Hello!")
        label.setAlignment(Qt.AlignmentFlag.AlignCenter)
        self.setCentralWidget(label)
        toolbar = QToolBar("My main toolbar")
        toolbar.setIconSize(QSize(16, 16))
        self.addToolBar(toolbar)
        button_action = QAction(
        QIcon(os.path.join(basedir, "bug.png")),
        "Your button",
        self,
        )
        button_action.setStatusTip("This is your button")
        button_action.triggered.connect(self.onMyToolBarButtonClick)
        button_action.setCheckable(True)
        toolbar.addAction(button_action)
        toolbar.addSeparator()
        button_action2 = QAction(
        QIcon(os.path.join(basedir, "bug.png")),
        "Your button2",
        self,
        )
        button_action2.setStatusTip("This is your button2")
        button_action2.triggered.connect(self.onMyToolBarButtonClick)
        button_action2.setCheckable(True)
        toolbar.addAction(button_action2)
        toolbar.addWidget(QLabel("Hello"))
        toolbar.addWidget(QCheckBox())
        self.setStatusBar(QStatusBar(self))
    def onMyToolBarButtonClick(self, s):
        print("click", s)

app = QApplication(sys.argv)
window = MainWindow()
window.show()
app.exec()
菜单
菜单是用户界面的另一个标准组件。通常它们位于窗口顶部,或在macOS系统中位于屏幕顶部。它们允许访问所有标准应用程序功能。存在一些标准菜单——例如文件、编辑、帮助。菜单可以嵌套以创建功能的分层树结构,并且它们通常支持并显示键盘快捷键以快速访问其功能。
要创建菜单,我们需要在 QMainWindow 上调用 .menuBar() 方法来创建菜单栏。我们通过调用.addMenu() 方法并传入菜单名称来在菜单栏上添加菜单。我将其命名为 ‘&File’ 。这里的 & 符号定义了快捷键,按下 Alt 键时可快速跳转到该菜单。要添加子菜单,只需通过调用父菜单的 addMenu() 方法创建一个新菜单。然后您可以像往常一样向其中添加操作项
class MainWindow(QMainWindow):
    def __init__(self):
        super().__init__()
        self.setWindowTitle("My App")
        label = QLabel("Hello!")
        # Qt 命名空间有许多用于自定义控件的属性。参见:http://doc.qt.io/qt-5/qt.html
        label.setAlignment(Qt.AlignmentFlag.AlignCenter)
        # 设置窗口的中央控件。默认情况下,控件将扩展以占据窗口中的所有空间。
        self.setCentralWidget(label)
        toolbar = QToolBar("My main toolbar")
        toolbar.setIconSize(QSize(16, 16))
        self.addToolBar(toolbar)
        button_action = QAction(
            QIcon(os.path.join(basedir, "bug.png")),
            "&Your button",
            self,
        )
        button_action.setStatusTip("This is your button")
        button_action.triggered.connect(self.onMyToolBarButtonClick)
        button_action.setCheckable(True)
        # 您可以使用键盘名称输入快捷键,例如Ctrl+p
        # Qt.命名空间标识符(例如 Qt.CTRL + Qt.Key_P)
        # 或系统无关标识符(例如 QKeySequence.Print)
        button_action.setShortcut(QKeySequence("Ctrl+p"))
        toolbar.addAction(button_action)
        toolbar.addSeparator()
        button_action2 = QAction(
            QIcon(os.path.join(basedir, "bug.png")),
            "Your &button2",
            self,
        )
        button_action2.setStatusTip("This is your button2")
        button_action2.triggered.connect(self.onMyToolBarButtonClick)
        button_action2.setCheckable(True)
        toolbar.addAction(button_action)
        toolbar.addWidget(QLabel("Hello"))
        toolbar.addWidget(QCheckBox())
        self.setStatusBar(QStatusBar(self))
        menu = self.menuBar()

        file_menu = menu.addMenu("&File")
        file_menu.addAction(button_action)

        file_menu.addSeparator()

        file_submenu = file_menu.addMenu("Submenu")

        file_submenu.addAction(button_action2)

    def onMyToolBarButtonClick(self, s):
        print("click", s)

app = QApplication(sys.argv)
window = MainWindow()
window.show()
app.exec()
对话框
在 Qt 中,对话框由 QDialog 类处理。要创建一个新的对话框只需创建一个 QDialog 类型的对象,并将其父控件(例如 QMainWindow )作为其父对象传递给该对象即可。
让我们创建自己的 QDialog 。首先,我们从一个简单的框架应用程序开始,该应用程序有一个按钮,该按钮与槽方法相连。
在槽 button_clicked (接收按钮按下的信号)中,我们创建对话框实例,并将我们的 QMainWindow实例作为父窗口传递。这将使对话框成为 QMainWindow 的模态窗口。这意味着对话框将完全阻止与父窗口的交互。
import sys
from PyQt6.QtWidgets import QApplication, QMainWindow, QPushButton, QDialogButtonBox, QDialog, QVBoxLayout, QLabel


def CustomDialog(self):
    pass


class MainWindow(QMainWindow):
    def __init__(self):

        super().__init__()


        self.setWindowTitle("My App")
        button = QPushButton("Press me for a dialog!")
        button.clicked.connect(self.button_clicked)
        self.setCentralWidget(button)

    def button_clicked(self, s):
        print("click", s)
        dlg = CustomDialog(self)
        if dlg.exec():
            print("Success!")
        else:
            print("Cancel!")
class CustomDialog(QDialog):
    def __init__(self, parent=None):
        super().__init__(parent)
        self.setWindowTitle("HELLO!")
        buttons = (
        QDialogButtonBox.StandardButton.Ok
        | QDialogButtonBox.StandardButton.Cancel
        )
        self.buttonBox = QDialogButtonBox(buttons)
        self.buttonBox.accepted.connect(self.accept)
        self.buttonBox.rejected.connect(self.reject)
        self.layout = QVBoxLayout()
        message = QLabel("Something happened, is that OK?")
        self.layout.addWidget(message)
        self.layout.addWidget(self.buttonBox)
        self.setLayout(self.layout)

app = QApplication(sys.argv)
window = MainWindow()
window.show()
app.exec()
请求单个值
有时您会需要从用户获取单个参数,并希望能够显示一个简单的输入对话框来获取该参数。对于此用例, PyQt6 提供了 QInputDialog 类。该类可用于获取不同类型的数据,同时还可以对用户输入的值设置限制。
静态方法都接受一个父控件的父参数(通常为 self )、一个对话框窗口标题的标题参数以及一个显示在输入框旁边的标签,以及其他类型特定的控件。调用这些方法时,它们会显示一个对话框,关闭后返回一个值和 ok 的元组,告知您是否按下了“确定”按钮。如果 ok 为 False ,则对话框已关闭。
首先,我们来看一个最简单的例子——一个按钮,它会弹出一个对话框,从用户那里获取一个整数值。它使用了 QDialog.get_int() 静态方法,传递了父级 self 、窗口标题和输入控件旁边显示的提示信息。
import sys
from PyQt6.QtWidgets import (
    QApplication,
    QInputDialog,
    QMainWindow,
    QPushButton
)


class MainWindow(QMainWindow):
    def __init__(self):

        super().__init__()
        self.setWindowTitle("My App")
        button1 = QPushButton("Integer")
        button1.clicked.connect(self.get_an_int)
        self.setCentralWidget(button1)

    def get_an_int(self):
        my_int_value, ok = QInputDialog.getInt(
            self, "Get an integer", "Enter a number"
        )
        print("Result:", ok, my_int_value)

app = QApplication(sys.argv)
window = MainWindow()
window.show()
app.exec()
(一)整数
如前所述,要从用户获取整数值,可以使用 QInputDialog.getInt() 方法。该方法会在对话框中显示
一个标准的 Qt QDoubleSpinBox 控件。您可以指定初始值、输入的最小值和最大值范围,以及使用箭头控件时的步长。
   def get_an_int(self):
       title = "Enter an integer"
       label = "Type your integer here"
       my_int_value, ok = QInputDialog.getInt(
           self, title, label, value=0, min=-5, max=5, step=1
      )
       print("Result:", ok, my_int_value)
(二)浮点数
对于浮点数类型,您可以使用 QInputDialog.getDouble() 方法—— Python中的 float 类型对应着C++ 中的 double 类型。这与上文的 getInt 输入完全相同,只是增加了 decimals 参数来控制显示的小数位数。
  def get_a_float(self):
      title = "Enter a float"
      label = "Type your float here"
      my_float_value, ok = QInputDialog.getDouble(
          self,
          title,
          label,
          value=0,
          min=-5.3,
          max=5.7,
          decimals=2,
      )
      print("Result:", ok, my_float_value)
(三)从字符串列表中选择
要从字符串列表中选择一个项,可以使用 QInputDialog.getItem() 方法。要选择的字符串列表通过items 参数提供。您可以通过将 current 参数设置为所选项的索引,来指定初始选中的项。默认情况下,该列表是可编辑的,即用户可以根据需要向列表中添加新项。您可以通过传递 editable=False 来禁用此行为。
   def get_a_str_from_a_list(self):
       title = "Select a string"
       label = "Select a fruit from the list"
       items = ["apple", "pear", "orange", "grape"]
       initial_selection = 2  # orange,从 0 开始索引
       my_selected_str, ok = QInputDialog.getItem(
           self,
           title,
           label,
           items,
           current=initial_selection,
           editable=False,
      )
       print("Result:", ok, my_selected_str)
(四)单行文本
要从用户获取一行文本,您可以使用 QInputDialog.getText 。您可以通过将文本作为参数传递来提供输入的初始内容。模式参数允许您在正常模式和密码模式之间切换,其中输入的文本以星号显示,分别传递 QLineEdit.EchoMode.Normal 或 QLineEdit.EchoMode.Password 。
   def get_a_str(self):
       title = "Enter a string"
       label = "Type your password"
       text = "my secret password"
       mode = QLineEdit.EchoMode.Password
       my_selected_str, ok = QInputDialog.getText(
           self, title, label, mode, text
      )
       print("Result:", ok, my_selected_str)
(五)多行文本
最后,要输入多行文本,您可以使用 QLineEdit.getMultiLineText() 方法。该方法仅接受文本的初始状态。
   def get_a_str(self):
       title = "Enter a string"
       label = "Type your password"
       text = "my secret password"
       mode = QLineEdit.EchoMode.Password
       my_selected_str, ok = QInputDialog.getText(
           self, title, label, mode, text
      )
       print("Result:", ok, my_selected_str)
   def get_text(self):
       title = "Enter text"
       label = "Type your novel here"
       text = "Once upon a time..."
       my_selected_str, ok = QInputDialog.getMultiLineText(
           self, title, label, text
      )
       print("Result:", ok, my_selected_str)
(五)使用 QInputDialog 实例
import sys
from PyQt6.QtWidgets import (
    QApplication,
    QInputDialog,
    QMainWindow,
    QPushButton, QWidget, QVBoxLayout, QLineEdit,
)

class MainWindow(QMainWindow):
    def __init__(self):
        super().__init__()
        self.setWindowTitle("My App")
        layout = QVBoxLayout()
        button1 = QPushButton("Integer")
        button1.clicked.connect(self.get_an_int)
        layout.addWidget(button1)
        button2 = QPushButton("Float")
        button2.clicked.connect(self.get_a_float)
        layout.addWidget(button2)
        button3 = QPushButton("Select")
        button3.clicked.connect(self.get_a_str_from_a_list)
        layout.addWidget(button3)
        button4 = QPushButton("String")
        button4.clicked.connect(self.get_a_str)
        layout.addWidget(button4)
        button5 = QPushButton("Text")
        button5.clicked.connect(self.get_text)
        layout.addWidget(button5)
        container = QWidget()
        container.setLayout(layout)
        self.setCentralWidget(container)


    def get_an_int(self):
        title = "Enter an integer"
        label = "Type your integer here"
        my_int_value, ok = QInputDialog.getInt(
            self, title, label, value=0, min=-5, max=5, step=1
        )
        print("Result:", ok, my_int_value)
def get_a_float(self):
        title = "Enter a float"
        label = "Type your float here"
        my_float_value, ok = QInputDialog.getDouble(
            self,
            title,
            label,
            value=0,
            min=-5.3,
            max=5.7,
            decimals=2,
        )
        print("Result:", ok, my_float_value)
    def get_a_str_from_a_list(self):
        title = "Select a string"
        label = "Select a fruit from the list"
        items = ["apple", "pear", "orange", "grape"]
        initial_selection = 2  # orange,从 0 开始索引
        my_selected_str, ok = QInputDialog.getItem(
            self,
            title,
            label,
            items,
            current=initial_selection,
            editable=False,
        )
        print("Result:", ok, my_selected_str)
    def get_a_str(self):
        title = "Enter a string"
        label = "Type your password"
        text = "my secret password"
        mode = QLineEdit.EchoMode.Password
        my_selected_str, ok = QInputDialog.getText(
            self, title, label, mode, text
        )
        print("Result:", ok, my_selected_str)
    def get_text(self):
        title = "Enter text"
        label = "Type your novel here"
        text = "请输入文本"
        my_selected_str, ok = QInputDialog.getMultiLineText(
            self, title, label, text
        )
        print("Result:", ok, my_selected_str)

app = QApplication(sys.argv)
window = MainWindow()
window.show()
app.exec()
文件对话框
在 PyQt6 中,文件对话框是通过 QFileDialog 类创建的。为了方便起见,它提供了一系列静态方法,您可以调用这些方法来显示特定的对话框,而无需进行过多配置。
import sys
from PyQt6.QtWidgets import (
    QApplication,
    QFileDialog,
    QMainWindow,
    QPushButton, QWidget, QVBoxLayout,
)
#通过 QFileDialog 类创建

class MainWindow(QMainWindow):
    def __init__(self):
        super().__init__()
        self.setWindowTitle("My App")
        button1 = QPushButton("Open file")
        button1.clicked.connect(self.get_filename)
        self.setCentralWidget(button1)
    def get_filename(self):
        filters = "Python Files (*.py)|*.py;;PNG (*.png)"
        filename, selected_filter = QFileDialog.getOpenFileName(self,filter=filters)
        print("Result:", filename, selected_filter)
(一)文件过滤器
Qt 文件过滤器的标准格式是一个字符串,其格式如下:用户友好名称可以是任意文本,而 *.ext 则是文件匹配过滤器和文件扩展名。该扩展名应在过滤器字符串末尾用括号括起。
"User-friendly name (*.ext)"
如果您想提供多个过滤器,可以使用 ;; (两个分号) 将它们分隔开。以下是一个示例,其中包括一个“*所有文件”过滤器。
"Portable Network Graphics Image (*.png);;Comma Separated files(*.csv);;All files(*)".
   def get_filename(self):
       filters = "Portable Network Graphics files (*.png);;CommaSeparated Values
(*.csv);;All files (*)"
       print("Filters are:", filters)
       filename, selected_filter = QFileDialog.getOpenFileName(
           self,
           filter=filters,
      )
       print("Result:", filename, selected_filter)

FILE_FILTERS = [
   "Portable Network Graphics files (*.png)",
   "Text files (*.txt)",
   "Comma Separated Values (*.csv)",
   "All files (*.*)",
]
initial_filter = FILE_FILTERS[2] # *.csv
# 构建以 ;; 分隔的过滤字符串
filters = ';;'.join(FILE_FILTERS)
(二)打开一个文件
要选择单个文件名以打开文件,可以使用 QFileDialog.getOpenFileName() 方法。
静态方法都接受一个父控件的父参数(通常为 self )和一个对话框标题的标题参数。它们还接受一个目录参数,该参数是对话框将打开的初始目录。标题和目录都可以是空字符串,在这种情况下,将使用默认标题,对话框将在当前文件夹中打开。除了 caption 和 'directory' 外,该方法还接受 filter 和 initialFilter 参数来配置文件过滤器。完成后,它返回所选文件作为字符串(包含完整路径)以及当前选定的过滤器。
   def get_filename(self):
       caption = "" # 空值使用默认标题。
       initial_dir = "" # 空文件夹使用当前文件夹。
       initial_filter = FILE_FILTERS[3] # 从列表中选择一个。
       filters = ";;".join(FILE_FILTERS)
       print("Filters are:", filters)
       print("Initial filter:", initial_filter)

       filename, selected_filter = QFileDialog.getOpenFileName(
           self,
           caption=caption,
           directory=initial_dir,
           filter=filters,
           initialFilter=initial_filter,
      )
       print("Result:", filename, selected_filter)
(三)打开多个文件
有时您希望用户能够一次加载多个文件——例如将一组数据文件加载到应用程序中。
QFileDialog.getOpenFileNames() 方法可实现此功能。该方法与上述单文件方法使用相同的参数,唯一区别在于它返回所选文件路径的字符串列表。
   def get_filenames(self):
       caption = "" # 空值使用默认标题。
       initial_dir = "" # 空文件夹使用当前文件夹。
       initial_filter = FILE_FILTERS[1] # 从列表中选择一个。
       filters = ";;".join(FILE_FILTERS)
       print("Filters are:", filters)
       print("Initial filter:", initial_filter)

       filename, selected_filter = QFileDialog.getOpenFileNames(
           self,
           caption=caption,
           directory=initial_dir,
           filter=filters,
           initialFilter=initial_filter,
    )
    print("Result:", filenames, selected_filter)
(四)保存一个文件
要保存文件,您可以使用 QFileDialog.getSaveFileName() 方法
   def get_save_filename(self):
       caption = "" # 空值使用默认标题。
       initial_dir = "" # 空文件夹使用当前文件夹。
       initial_filter = FILE_FILTERS[2] # 从列表中选择一个。
       filters = ";;".join(FILE_FILTERS)
       print("Filters are:", filters)
       print("Initial filter:", initial_filter)

       filename, selected_filter = QFileDialog.getSaveFileName(
           self,
           caption=caption,
           directory=initial_dir,
           filter=filters,
           initialFilter=initial_filter,
      )
       print("Result:", filename, selected_filter)
(五)制作功能整合页面
import sys
from PyQt6.QtWidgets import (
    QApplication,
    QFileDialog,
    QMainWindow,
    QPushButton, QWidget, QVBoxLayout,
)


FILE_FILTERS = [
    "Portable Network Graphics files (*.png)",
    "Text files (*.txt)",
    "Comma Separated Values (*.csv)",
    "All files (*.*)",
]


class MainWindow(QMainWindow):
    def __init__(self):
        super().__init__()

        self.setWindowTitle("My App")

        layout = QVBoxLayout()

        button1 = QPushButton("Open file")
        button1.clicked.connect(self.get_filename)
        layout.addWidget(button1)

        button2 = QPushButton("Open files")
        button2.clicked.connect(self.get_filenames)
        layout.addWidget(button2)

        button3 = QPushButton("Save file")
        button3.clicked.connect(self.get_save_filename)
        layout.addWidget(button3)
        button4 = QPushButton("Select folder")
        button4.clicked.connect(self.get_folder)
        layout.addWidget(button4)

        container = QWidget()
        container.setLayout(layout)
        self.setCentralWidget(container)

    def get_filename(self):     #打开单个文件
        caption = "open file"
        initial_dir = ""
        initial_filter = FILE_FILTERS[3]
        dialog = QFileDialog()
        dialog.setWindowTitle(caption)
        dialog.setDirectory(initial_dir)
        dialog.setNameFilters(FILE_FILTERS)
        dialog.selectNameFilter(initial_filter)
        dialog.setFileMode(QFileDialog.FileMode.ExistingFile)

        ok = dialog.exec()
        print(
            "Result:",
            ok,
            dialog.selectedFiles(),
            dialog.selectedNameFilter(),
        )

    def get_filenames(self):    #打开多个文件
        caption = "Open files"
        initial_dir = ""  # 空文件夹使用当前文件夹
        initial_filter = FILE_FILTERS[1]  # 从列表中选择一个

        dialog = QFileDialog()
        dialog.setWindowTitle(caption)
        dialog.setDirectory(initial_dir)
        dialog.setNameFilters(FILE_FILTERS)
        dialog.selectNameFilter(initial_filter)
        dialog.setFileMode(QFileDialog.FileMode.ExistingFiles)

        ok = dialog.exec()
        files = dialog.selectedFiles()  # 获取选中的文件列表

        print(
            "Result:",
            ok,
            files,  # 显示所有选中的文件
            dialog.selectedNameFilter(),
        )

    def get_save_filename(self):
        caption = ""  # 空值使用默认标题。
        initial_dir = ""  # 空文件夹使用当前文件夹。
        initial_filter = FILE_FILTERS[2]  # 从列表中选择一个。
        filters = ";;".join(FILE_FILTERS)
        print("Filters are:", filters)
        print("Initial filter:", initial_filter)
        filename, selected_filter = QFileDialog.getSaveFileName(
            self,
            caption=caption,
            directory=initial_dir,
            filter=filters,
            initialFilter=initial_filter,
        )
        print("Result:", filename, selected_filter)

    def get_folder(self):
        caption = "Select folder"
        initial_dir = ""  # 空文件夹使用当前文件夹。

        dialog = QFileDialog()
        dialog.setWindowTitle(caption)
        dialog.setDirectory(initial_dir)
        dialog.setFileMode(QFileDialog.FileMode.Directory)

        ok = dialog.exec()


        print(
            "Result:",
            ok,
            dialog.selectedFiles(),
            dialog.selectedNameFilter(),
        )

app = QApplication(sys.argv)
window = MainWindow()
window.show()
app.exec()
- 鼠标事件
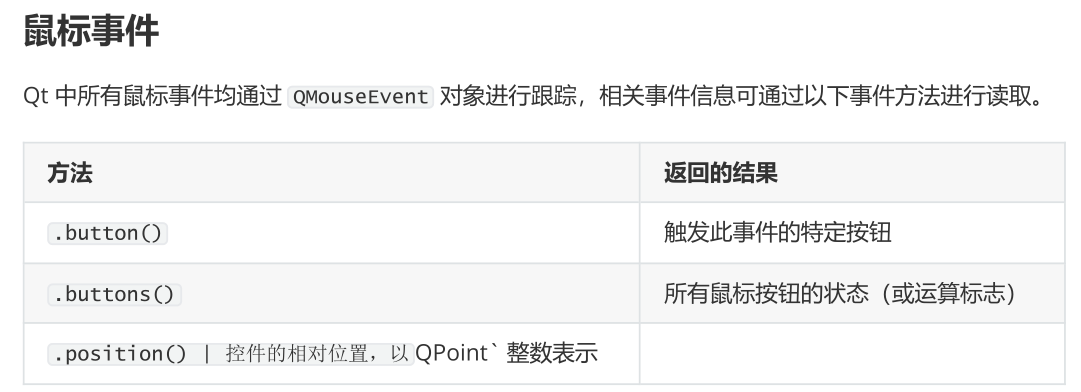
控件接收的主要事件之一是 QMouseEvent 。 QMouseEvent 事件是在控件上每次鼠标移动和按钮点击时创建的。以下事件处理程序可用于处理鼠标事件


import sys
from PyQt6.QtCore import Qt
from PyQt6.QtGui import QAction
from PyQt6.QtWidgets import (
    QApplication,
    QLabel,
    QMainWindow,
    QMenu,
)
class MainWindow(QMainWindow):
    def __init__(self):
        super().__init__()
        self.label = QLabel("Click in this window")
        self.setCentralWidget(self.label)
    def mouseMoveEvent(self, e):
        self.label.setText("鼠标移动")

    def mousePressEvent(self, e):
        if e.button() == Qt.MouseButton.LeftButton:
            # 在此处理左键按下事件
            self.label.setText("左键按下事件")

        elif e.button() == Qt.MouseButton.MiddleButton:
            # 在此处理中间按钮的按下操作
            self.label.setText("中间按钮的按下操作")

        elif e.button() == Qt.MouseButton.RightButton:
            # 在此处处理右键按下事件
            self.label.setText("右键按下事件")

    def mouseReleaseEvent(self, e):
        if e.button() == Qt.MouseButton.LeftButton:
            self.label.setText("左键松开")

        elif e.button() == Qt.MouseButton.MiddleButton:
            self.label.setText("中间按钮松开")

        elif e.button() == Qt.MouseButton.RightButton:
            self.label.setText("右键松开")

    def mouseDoubleClickEvent(self, e):
        if e.button() == Qt.MouseButton.LeftButton:
            self.label.setText("左键双击")

        elif e.button() == Qt.MouseButton.MiddleButton:
            self.label.setText("中间按钮双击")

        elif e.button() == Qt.MouseButton.RightButton:
            self.label.setText("右键双击")

    def contextMenuEvent(self, e):
        context = QMenu(self)
        context.addAction(QAction("test 1", self))
        context.addAction(QAction("test 2", self))
        context.addAction(QAction("test 3", self))
        context.exec(e.globalPos())

app = QApplication(sys.argv)
window = MainWindow()
window.show()
app.exec()
上下文菜单
上下文菜单是小型上下文相关菜单,通常在右键单击窗口时出现。Qt 支持生成这些菜单,并且控件有一个用于触发它们的特定事件。在下面的示例中,我们将拦截 QMainWindow 的 .contextMenuEvent 。每当上下文菜单即将显示时,都会触发此事件,并传递一个类型为 QContextMenuEvent 的单一值事件。
要拦截该事件,我们只需用我们的新方法覆盖对象方法,该方法具有相同的名称。因此,在这种情况下,我们可以在 MainWindow 子类中创建一个名为 contextMenuEvent 的方法,它将接收所有此类型的事件。
def contextMenuEvent(self, e):
    context = QMenu(self)
    context.addAction(QAction("test 1", self))
    context.addAction(QAction("test 2", self))
    context.addAction(QAction("test 3", self))
    context.exec(e.globalPos())

comment 评论区
star_outline 咱快来抢个沙发吧!